How to build a simple finance application in Java
By a beginner for beginners
Hello there!
This is a simple personal finance application I made today. I wanted to make a small size project to getting started with GUI development and I'd like to share the entire process.
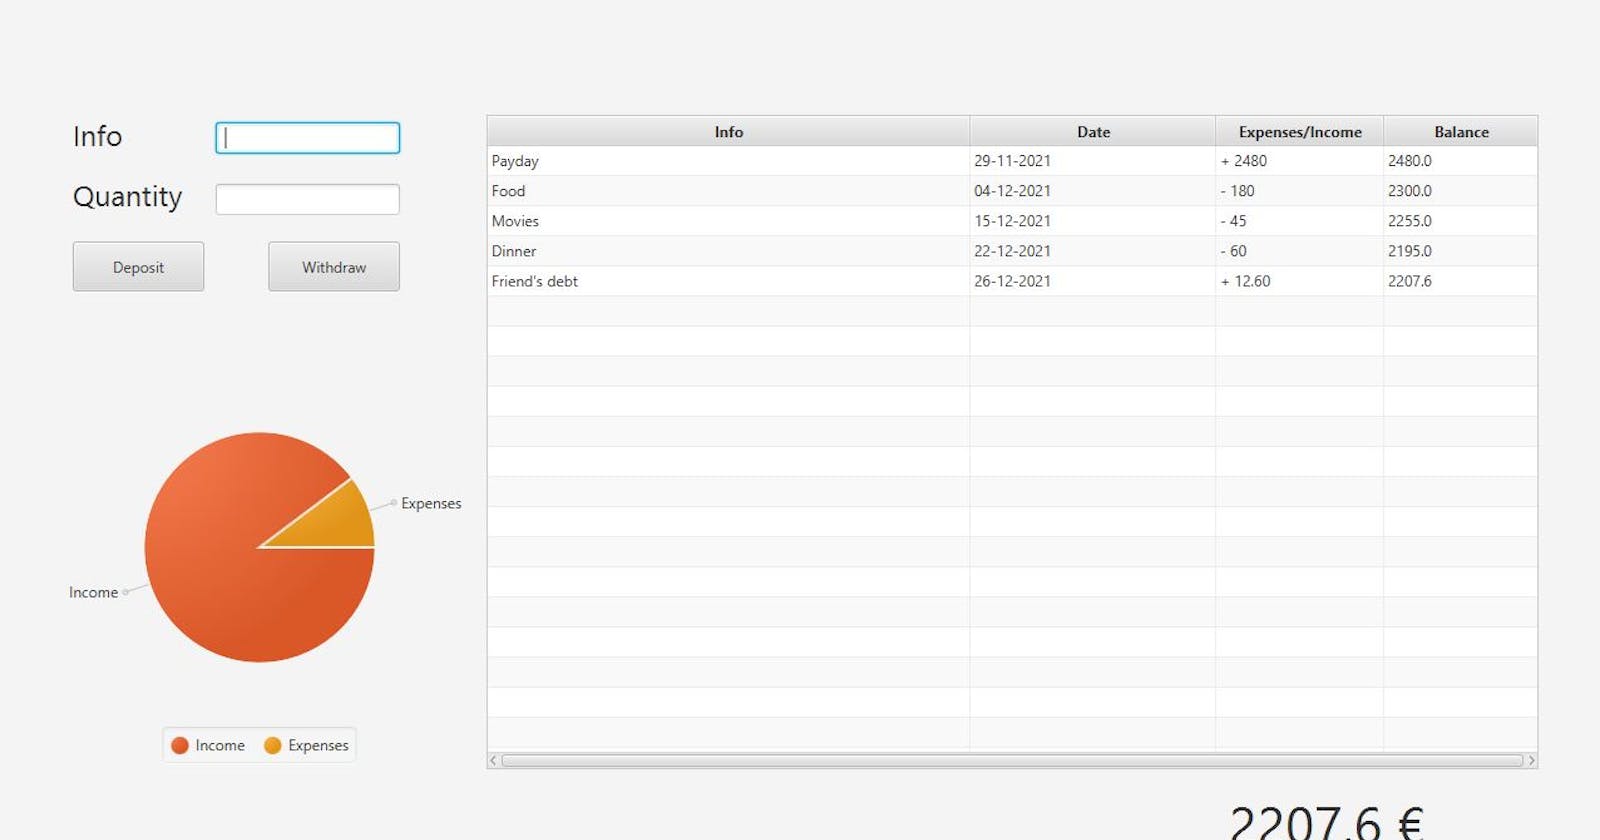
We'll be using Java and JavaFX to build our application. This programm will allow us to input incomes and expenses, expose out data in a table and a pie chart to help us compare what we deposit and withdraw.
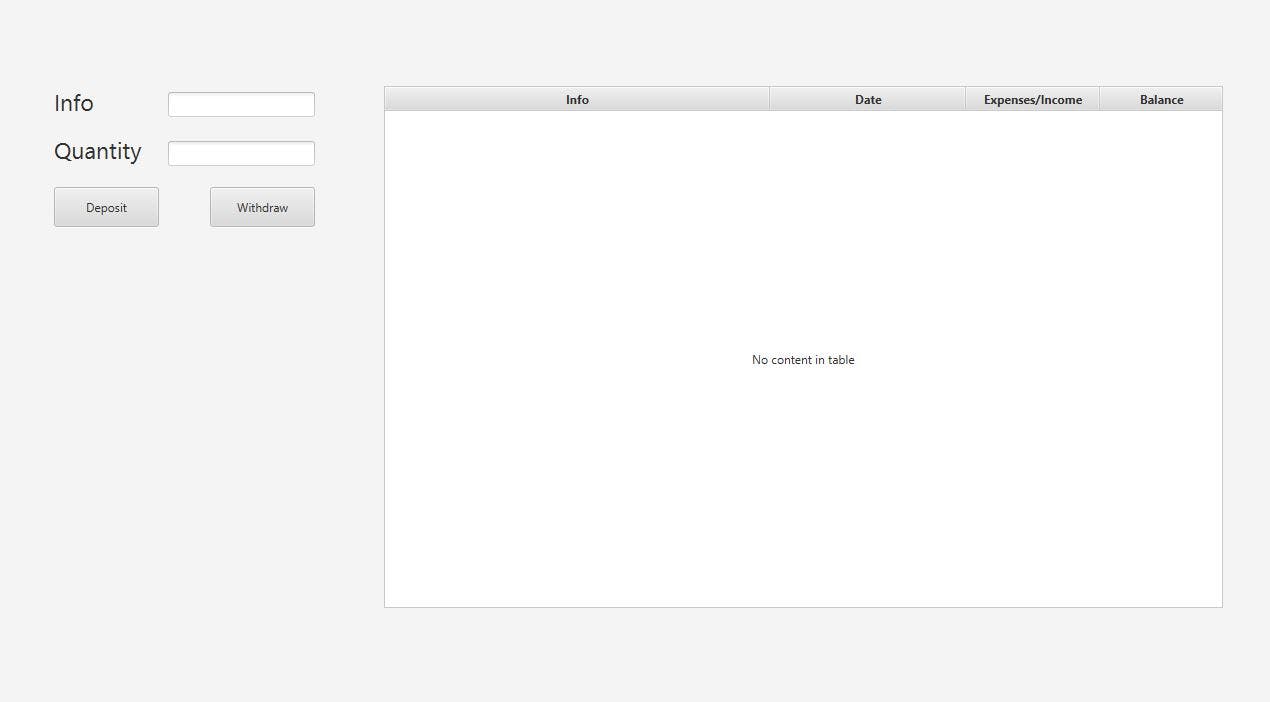
The first thing we're going to do is build our interface with the SceneBuilder. This tool is really easy to use and allow us to make interfaces without writing a single line of code (maybe a couple) .

Nothing too fancy but it'll do the work.
We now need to build our main object : transactions. Every transaction will be formed by:
- Information: About the expense or income. Debt, food, pay ...
- Date
- Expenses/Income: Is it a positive or negative number? Positive if we press 'Deposit', negative if we press 'Withdraw' .
- Balance: Our final balance after the transaction.
Then we create the class Transaction and our code should look something like this:
public class Transaction {
    private SimpleStringProperty info;
    private SimpleStringProperty expensesIncome;
    private SimpleStringProperty date;
    private SimpleDoubleProperty balance;

    public Transaction(String info, String date, String expensesIncome, Double balance) {
        this.info = new SimpleStringProperty(info);
        this.date = new SimpleStringProperty(date);
        this.expensesIncome = new SimpleStringProperty(expensesIncome);
        this.balance = new SimpleDoubleProperty(balance);
    }

}
You should build the getters too but I don't want to use more space than is necessary.
The next step is not really important but I like to have a different class for the TransactionList. Is just an object array but I think is cleaner this way.
public class TransactionList {

    Transaction[] transactions;
    int ocupation = 0;

    public void createList() {
        transactions = new Transaction[1000];
    }

    public Transaction[] getList() {
        return transactions;
    }
}
Now that we have our objects the next step is connect the interface to the code. In JavaFX we use a special class named Controller.
The first thing to do is create the table. In the SceneBuilder we stablished names for every columns:
- infoCol
- dateCol
- expensesCol
- balanceCol
We want to create the table when the application starts so we make an initialize function:
public void initialize(URL url, ResourceBundle rb){
    transactionList = new TransactionList();
    transactionList.createList();
    ObservableList<Transaction> observableList = FXCollections.observableArrayList();
    expensesCol.setCellValueFactory(new PropertyValueFactory<>("outcomeIncome"));
    infoCol.setCellValueFactory(new PropertyValueFactory<>("info"));
    balanceCol.setCellValueFactory(new PropertyValueFactory<>("balance"));
    dateCol.setCellValueFactory(new PropertyValueFactory<>("date"));
    table.setItems(observableList);
}
We first create our transaction list. We will use this list in a moment. The important list right now is the ObservableList. This one is the one we're going to see in the interface table. Finally we create the columns and the table is ready.
Let's create now three static variables that will come us handy in the future.
private static double balance = 0;
private static double expenses = 0;
private static double income = 0;
Next step is writing our Deposit/Withdraw functions wich will be almost identical.
public void deposit(ActionEvent actionEvent) throws IOException {
    balance += Double.parseDouble(quantityTF.getText());
    Transaction transaction = new Transaction(infoTF.getText(), getDate(), "+ " + quantityTF.getText(), round(balance));
    table.getItems().add(transaction);
    income += Double.parseDouble(quantityTF.getText());
    transactionList.getList()[transactionList.ocupation] = transaction;
    transactionList.ocupation++;
    writeTransactionsTextFile(transactionList);
    printBalance();
    printPieChart();
}

public void withdraw(ActionEvent actionEvent) throws IOException {
    balance -= Double.parseDouble(quantityTF.getText());
    Transaction transaction = new Transaction(infoTF.getText(), getDate(), "- " + quantityTF.getText(), round(balance));
    table.getItems().add(transaction);
    expenses += Double.parseDouble(quantityTF.getText());
    transactionList.getList()[transactionList.ocupation] = transaction;
    transactionList.ocupation++;
    writeTransactionsTextFile(transactionList);
    printBalance();
    printPieChart();
}
We add our transaction objects to both lists and change out balance to keep it updated. I also created a little function that prints the current balance in the application interface. We also modify our expenses/income variables that we are going to use later. Those variables called quantityTF and infoTF are the textfields from where we take the data we print in the table.
Let's take a look now to the printPieChart function:
public void printPieChart() {
    ObservableList<PieChart.Data> pierChartData = FXCollections.observableArrayList(
            new PieChart.Data("Income", income),
            new PieChart.Data("Expenses", expenses)
    );

    pieChart.setData(pierChartData);
}
It just creates an ObervableList and prints the income/expenses values in a cute little pie chart.
At this point the application is pretty much finished. The last step is store the data and work with it even if we closed the application. For that we will use a csv file and write in it every time we make a transaction. Let's take a look to the function:
public static void writeTransactionsTextFile(TransactionList transactionList) throws IOException {
    FileWriter transactions = new FileWriter("transactions.csv");
    try {
        transactions.write(  "Info;Date;Expenses/Income;Balance;Expenses;Income\n");
        for (int i = 0; transactionList.getList()[i] != null; i++) {
            transactions.write(transactionList.getList()[i].getInfo() + ";" + transactionList.getList()[i].getDate() + ";" + transactionList.getList()[i].getOutcomeIncome() + ";" + transactionList.getList()[i].getBalance() + ";" + expenses + ";" + income + "\n");
        }
        transactions.close();
    } catch (IOException e) {
        e.printStackTrace();
    }

}
In the first place we create a file. Then we write our data in it using ';' as a field separator. This will separate the data in cells. To write the data, we use the transactionList we created at the beginning of this guide. The for loop will read every object of the array until it finds a null value.
The final step to make this work is reading the file (if there is one) when we start the application so we have to add a couple of lines to our initialize function:
    try {
        BufferedReader reader = new BufferedReader(new FileReader("transactions.csv"));
        String line = reader.readLine();
        line = reader.readLine();
        int i = 0;
        while (line != null) {
            String[] parameter = line.split(";");
            Transaction transaction = new Transaction(parameter[0], parameter[1], parameter[2], Double.parseDouble(parameter[3]));
            balance = Double.parseDouble(parameter[3]);
            expenses = Double.parseDouble(parameter[4]);
            income = Double.parseDouble(parameter[5]);
            transactionList.getList()[i] = transaction;
            observableList.add(transaction);
            i++;
            transactionList.ocupation++;
            line = reader.readLine();
        }
        reader.close();
    } catch (Exception e) {
        e.printStackTrace();
    }
This function will search if there is a csv file to read and then read every single line while storing the different parameters (fields separated by ';') in both transactionList and ObservableList. If we have a csv file we'll have out application the exact same way it was when we closed our program. On the other hand if there is no csv file, the application will just work the same way as before with both lists completely empty.
Finally the application is finished. A lot of things can be improved and different features can be added such as different 'accounts', a delete data function or even a more sophisticated design. The entire code is available at github.com/lrluque/LRFinances so you can modify it and make it yours. I really hope you like the article.
See you there!

